In order to introduce the project, its context is first
provided. The project goals are then described,
similar work discussed and the structure of this report is described.
Smart cards are plastic cards with an embedded chip, and
have a wide range of everyday applications, such as:
·
Bank cards, such as credit and debit cards
·
Cards that hold money (“stored value cards”) or
money equivalents (“affinity cards”, such as phone cards)
·
Mobile phone SIM (Subscriber Information Module)
Cards
·
Identity cards, which provide identification
when connecting to a computer network
·
Subscription cards for satellite, cable and
digital broadcast television set-top boxes
Recently developed are contact-less smart cards, which
communicate electromagnetically with the card reader at a distance of about 5-8
centimetres. These are proving useful in
situations where fast interaction is required, such controlling access to
public transportation systems, or where transparency of the interaction is
important, such as chips embedded into car keys as part of anti-theft systems.
Smart cards are tamper-resistant and generally use
encryption to secure identity and prevent unauthorised access or piracy. Stored value cards hold information locally,
and hence they do not need to access remote databases, incurring a much lower
overhead than traditional magnetic-stripe card systems. This means that they can be used for large
numbers of low value transactions, suitable for electronic cash systems and
public telephones.
Invented in 1974, there are now over 3 billion smart cards
in circulation, the majority of which are found in Europe,
South America and Asia. Their use in the United
States and the United
Kingdom has lagged behind but is now growing
rapidly.
There are two main types of smart cards: those with a
microprocessor (commonly referred to as chip cards), and those with a pre-defined
logic (memory cards). Memory cards can
only perform a fixed set of operations, whereas chip cards can run programs
stored in the card’s memory and, importantly, can download and run new programs
after the card has been made and issued.
A typical chip card has a 16-bit processor, tens of kilobytes of ROM and
EEPROM (writable memory that is not lost when power is removed), and about a
kilobyte of volatile RAM.
Smart card development has always been driven by standards
to ensure interoperability between different cards and card readers. Both international (the ISO 7816 series) and
commercial (e.g. EuroPay/MasterCard/Visa) standards have been developed to
define the communication protocol between cards and card readers.
However, with the advent of chip cards, there was no
standard concerning the interaction with a chip card’s operating system, nor a
universal framework on top of which to build card applications (applets). Initially applets were written in a low-level
language, tightly coupled to the type of processor, the operating system, which
was often modified to suit the specificities of the applet. However, in 1996, a team of engineers at
Schlumberger managed to squeeze a version of the Java Virtual Machine onto a
chip card with only 12 kilobytes of memory, eventually leading to the
development of the Java Card platform.
Java is a high-level multi-platform object-oriented
programming language. Java programs are
not compiled directly to native code, but are compiled into virtual machine
instructions, stored in a .class file, which are then run by a virtual machine.

Figure 1 Compilation and execution of a Java
program
Once a virtual machine has been implemented for a certain
computing platform, the .class files generated by any Java compiler can be
executed on it. As virtual machines are
now available for many different platforms, a Java program can be run on any
one of them without modification or recompilation.
The advantages that Java brings to a chip card environment,
compared to the previous proprietary systems, are many, and all major
developers for the chip card market have made commitments to the Java Card
platform. Such advantages are:
·
Java: applets can be written in a widely-known,
high-level and object-oriented programming language.
·
Interoperability: a Java Card applet can run on
any Java Card, irrespective of its processor type or any other hardware
specific.
·
Common framework: a set of framework classes
allows the developer to concentrate on application-specific code.
·
Dynamic loading of applets: a company can easily
load new applets onto a Java Card without having to reissue the card.
·
Secure: a Java Card can contain applets from
different companies which can interact with each other, but are prevented from
accessing, modifying protected data and interfering with each other’s
behaviour.
However, to allow Java to run on such a limited platform, a
number of simplifications and modifications had to be made to the Java language
and the Java Virtual Machine. Full
details of these changes can be found in [Sun00].
At a language level, the most important changes are as
follows:
·
No large primitive types like 64-bit integers,
characters and floating point numbers.
Support for 32-bit integers is optional.
·
No threads.
·
No multidimensional arrays.
·
Garbage collection is optional, and hence
finalisation is not supported.
·
No dynamic class loading. Applets, however, can be dynamically loaded
by a card reader.
The Java Card virtual machine is split into two parts. The first part, known as the converter, runs
off-card on a normal workstation, and serves to make the second part, known as
the interpreter, which runs on-card in the limited environment, as small and
simple as possible.
The converter reads a Java .class file and performs two main
operations: it verifies that no unsupported language features are used, and it
converts all package, class, method and field names to numeric
identifiers. This not only reduces the
size of the program, which will be stored in a Java Card’s limited memory, but
performs a significant part of the linking process, which would have otherwise
have been executed using the Java Card’s limited processing power. The resulting representation is written to a
CAP (converted applet) file.
Additionally, an EXP (export) file is created which stores
the name and numeric identifier of the package and of each publicly accessible
class, method and field, so that references to these objects made in other
applets can be converted to the correct values.
The CAP file is loaded onto the Java Card by a card reader,
and the interpreter is then able to perform the last stage of the linking
process so that the applet is ready for use.
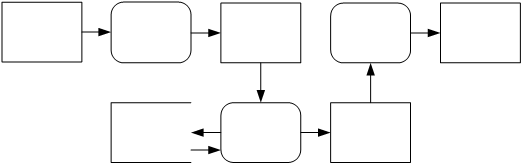
Figure 2
Compilation, conversion and execution of a Java Card applet
Although the interpreter is just the on-card part of the
Java Card virtual machine, it is commonly referred to as the “virtual
machine”. For this reason, the terms
“virtual machine” and “interpreter” are used interchangeably in this report to
refer to the on-card part of the Java Card virtual machine.
1.3
Carmel and the SecSafe Project
The SecSafe (SECure and SAFe) project is an EU-funded
research project which is researching the use of static analysis to as a way of
proving the security features of the Java Card platform and Java Card
applets. Static analysis is performed
without actually executing the applet, but by examining its structure.
While it would be possible to make proofs on a Java Card
applet’s original Java source, a separate proof would be required to show that
the Java compiler and the off-card converter preserve the result of the
proof. As the translation between Java
language and the Java Card virtual machine language (JCVML) is not simple, such
proofs would be significantly more complex than proofs made directly on the
JCVML.
However, JCVML instructions are represented in binary form,
stored in CAP and EXP files. It is
therefore important to define a textual syntax for this language to facilitate
the expression of proofs, and for communicating JCVM programs between humans.
Carmel (also
known as JCVMLe) is such a textual representation. Package, class, interface, field and methods
are defined in a syntax based on the syntax of the Java language. However, method bodies, which contain JCVM
instructions, are particular to JCVML and are represented in a different
syntax. The full Carmel
syntax, as defined in the context of this project, can be found in Appendix A.
The goal of this project is to model the operation of a Java
Card, as defined by the operational semantics developed for the SecSafe project
[SH01]. This involves implementing a
Java Card virtual machine and providing a graphical interface to view its
internal state and allow the user to simulate communication with a card
reader. Instead of interpreting
pre-compiled applets, the virtual machine will interpret Carmel
source files directly.
The program has two purposes. Firstly, it is to be used a general-purpose
tool by SecSafe members to aid the validation and proving of Java Card based
systems. Secondly, the loading, linking
and verification components are to be reused in a future tool to perform static
analyses of Carmel programs.
Specifically, the goals are:
·
The design and implementation of a program that
models a Java Card, including its virtual machine and its external interface
with a card reader.
·
The virtual machine is to interpret programs
express in the Carmel language.
·
The behaviour of the interpreter is to respect
the defined operational semantics.
·
The program is to run from the web.
·
The program is to provide a graphical
representation of the Java Card’s internal state at given points during a
program’s execution.
·
The graphical user interface should be easy to
use and express the internal state in a way understandable to the user.
·
The program is to be designed in a modular
fashion to facilitate code re-use.
Considering the size of the project, it was expected that
the project would not be completed within the limited amount of time available
(less than four months), and as such, the goals are to be considered as targets
to work towards.
Sun Microsystems provides a Java Card simulator and
debugger, called the Java Card Toolkit, to licensees of Java Card technology. It integrates with third-party IDEs
(Integrated Development Environments) and helps Java Card developers implement
and debug Java Card applets. However, it
is not free: licensing Java Card technology from Sun is very costly. Sun also provides a simpler, free
implementation of a Java Card virtual machine which runs on Windows and Solaris
workstations.
While these are useful tools for developers of Java Card
applets, they are not particularly suited for the needs of the SecSafe project,
such as static analysis of Java Card applets, and conformity to the Carmel
operational semantics. Additionally,
neither of the tools supports the Carmel
language.
The rest of the report is organised as follows:
Section 2 describes the initial decisions taken before the
design stage, such as the choice of the program’s architecture and language.
Sections 3, 4, and 5 describe the design and implementation
of the three main components of the program: the loader, which loads Carmel
programs into memory; the interpreter, which interprets them; and the user
interface, which allows the user to control the interpreter, and represents its
internal state.
Section 6 describes the creation of the project web site and
the technology used to launch the program over the web.
Section 7 evaluates the work performed and section 8
provides a conclusion, along with possible improvements and extensions to the
project.
References can be found in section 9, and there are two
appendices: the first defining the grammar of the Carmel
language and the second detailing security checks that were not implemented.
As the interpreter is to be launched over the web, I had a
choice as to where the interpreter would execute: client-side or server-side. Client-side means that the interpreter’s code
is downloaded from the web server by the end-user, and then run on the user’s
computer. Server-side means that the
interpreter’s code executes on the web server, and that communication with the
end-user takes place over the network via HTTP messages.
The disadvantage of a server-side approach is that all
communication between the user and the interpreter has to take place between
the browser and the web server, and therefore:
1. The
time to react to a user’s command would be noticeable, as a message needs to be
sent, processed, the new contents of the web page generated and sent back
again.
2. The
interpreter’s state would have to be represented in HTML. As the interpreter’s state is complex,
representing it in HTML would be difficult, and would not permit it to be
displayed in an optimal manner.
3.
The graphical controls for the interpreter would
also have to be represented in HTML, which only has a limited support for
buttons and links, making the design of a rich and easy-to-use graphical
interface difficult.
The advantage of such an approach, however, is that the only
requirement for the end-user to be able to use the interpreter is to have a web
browser and an Internet connection; no specific platform, operating system or
additional software is required.
However, given that the expected users of the interpreter
are very likely to be Java Card researchers or developers, and that the
development and execution of Java Card programs requires Java, it can safely be
taken for granted that they will have Java installed on their machines. Java runs on all major computing platforms
and supports client-side execution of applications over the web, and so such a
solution seemed ideal.
Before making the decision to use a Java-based client-side
solution, it was important to be sure that Java was a suitable language for the
project. The main parts of the
interpreter are: parsing Carmel
programs, building and linking the abstract syntax tree, interpreting Carmel
instructions, displaying the interpreter’s state to the user, and the
web-launcher.
Java is a general purpose, high-level, object-oriented
language with which I was already familiar.
I knew from experience and by researching existing programs that implementing
a large project such as the interpreter would not pose any special problems at
a language level. Indeed, as Carmel
is a language very close to Java, with similar concepts and the same data types
and operators, interpreting Carmel
instructions and representing Carmel
types in Java is intuitively a logical choice.
However, it was also important that the necessary tools were
available in Java. Parsers are usually
generated automatically from their grammars by parser generators. Similarly, there exist tools for building the
first stage of an abstract syntax tree.
I researched the availability of these tools for Java, and found that I
had a wide range of frequently used tools to choose from. The decisions as to which tools I used can be
found in sections 3.3.1 and 3.4.1.
Similarly, I wanted to be sure that Java provided suitable
graphical components which to build the interpreter’s graphical interface. I had a choice between AWT and Swing, and
found that Swing satisfied the needs of the project. This decision is detailed in section 5.1.
Finally, I had to ensure that Java programs could be
launched from the web. I found that I
had a choice of web launch technologies, which are described in section 6.1.
Therefore, having ensured that Java was a suitable language,
and that the required tools were available for it, I made the final decision to
use it as part of a client-side solution.
In this section, I will describe the design and
implementation of the loading, parsing, linking and verifying of Carmel
programs. These processes progressively
construct a valid internal representation of a Carmel
program, which is in the form of an abstract syntax tree. Once the tree is built, the program is ready
to be interpreted.
Before implementing the loading process, it was first
necessary to design the classes with which to represent Carmel
programs. The first three sections describe
how the Java Card and Virtual Machine type systems are modelled, along with the
singleton design pattern which influenced their design. The final two sections describe the design of
the abstract syntax tree, along with the visitor design pattern which provides
a useful way with which to process its nodes.
There are two different sets of Java types: primitive types
and reference types. Primitive types are
those that are supported directly by the Java virtual machine, and reference types
are classes and interfaces that are defined by the user.
Java Card supports a subset of the Java primitive types:
boolean, byte, short and, optionally, int.
It does not support char, long, float and double. Java Card supports all four Java reference
types: classes, interfaces, arrays and null.
Although never explicitly used in a Java or Java Card program, null is
the type of the value null. There is a
second special type: void. Void is only
used for method return types, and denotes that the method does not return a
value.
In creating classes to represent the Java Card types, I
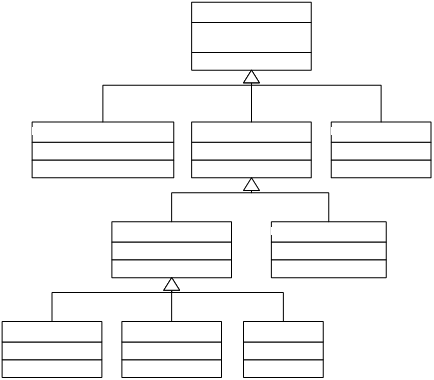
created abstract classes to group together related types. The class hierarchy is shown in Figure 3.
The root of the hierarchy is ResultType. ResultType encompasses VoidType, which cannot
have a value, and Type, which represents the other types, which do have
values. Type is further split into
PrimitiveType and ReferenceType. The
numeric primitive types are grouped together by NumericType. ReferenceType is split into ClassOrInterface,
ArrayType and NullType.
ClassOrInterface is split into Class and Interface. Detail on the design of Class and Interface
is given in section 3.1.4. ArrayType
contains a reference to its component type, represented by the interface
ComponentType. As multidimensional
arrays are not permitted in Java Card, ComponentType is not implemented by
ArrayType, but is implemented by all other types except VoidType and
NullType.
ComponentType and ReferenceType, along with their
supertypes, Type and ResultType, are implemented as interfaces to allow for
multiple inheritance. In Java, classes
can only have one superclass, but any number of superinterfaces. ClassOrInterface inherits from both ReferenceType
and ComponentType, which would not be possible if they were not
interfaces. This also leaves
ClassOrInterface the possibility to have a superclass (which it does: see
section 3.1.4 for more details).
Each type that implements the Type interface implements the
method getJCVMType which returns the corresponding type in the virtual machine
type system, as described in the next section.
Finally, each type implements the isAssignableFrom
method. A type implements the method to tests
whether the type of the specified parameter is the same, or can be converted to
the same type via a widening reference conversion. A widening reference conversion can take
place if the parameter’s type is a class or interface, and the type is either a
superclass or an interface that is implemented by the parameter’s type.
As primitive types are neither classes nor interfaces, they
simply check to see if the parameter’s type is equal to them. Classes check to see if they are the same as,
or a superclass of the parameter’s type.
Interfaces check to see if they are the same as, or are implemented
directly or indirectly by, the parameter’s type. Arrays check to make sure the other type is
an array and, if so, checks the component types. An exception is made for the null type, whose
value can be assigned to any reference type.
For more information, see section 5.1, and specifically
section 5.1.4 of [GJSB00].

Figure
3 Java
card types
Note: ClassOrInterface is shown in greater detail in Figure 5.
The type system of the Java Card virtual machine is related,
but not identical, to that of Java Card.
The boolean type does not exist at the virtual machine level, but is
considered identical to the byte type.
There is an additional return address type, which represents the type of
a subroutine call’s return address.
Finally, there is the ^
type, which represents the type of an undefined value, such as that of an
uninitialised local variable.
In creating classes to represent the virtual machine, I took
into account the type hierarchy described in [SH01] and [Mar01] and made some
minor modifications to take into account the requirements of the
interpreter. The class hierarchy is
shown in Figure 4.
The root of the hierarchy is JCVMType. JCVMType encompasses JCVMReturnAddressType,
JCVMOperandType, and JCVMBottomType, which represents the ^
type. JCVMOperandType represents all
types that can be used as an instruction operand, and is split into
JCVMNumericType and JCVMReferenceType.
JCVMReferenceType is the corresponding virtual machine type for classes,
interfaces, arrays and the null type.
Figure
4 Virtual
machine types
In order to use object oriented programming techniques such
as virtual methods with the classes that represent Java Card and virtual
machine types, class instances are required.
With the exception of an array type, it does not make any sense to have
more than one instance of each type. In
fact, multiple instances waste memory and complicate checking for equality.
The singleton design pattern, as defined in [GHVJ94],
ensures that only one instance of a given class can ever exist. Instantiation can be controlled by giving
constructors protected or private access modifiers, and then providing a
publicly accessible static method or static final field that gives access to
the single instance, which is created internally on class initialisation.
Each concrete class representing a Java Card or virtual
machine type therefore has a private constructor and a public static final
field named TYPE which provides access to the single instance.
The abstract syntax tree is simply a tree representation of
a Carmel program that is in a
format suitable for interpretation, unlike the flat textual representation
which is suitable for humans to read, write and understand.
The first step in designing the abstract syntax tree was to
make a list of all of the different classes I would need to implement in order
to represent each node of the tree: package, class, interface, constructor,
method, field, each of the instructions and exception handler. In doing so, I tried to stay close to the
program structure defined in [Mar01].
Having done this, I looked at common attributes and
behaviours amongst these classes and designed abstract superclasses to
factorise these commonalities. Hence, I
created the abstract classes “Field” as a parent for static and instance
fields; “ConstructorOrMethod”; “ClassMember” for constructors, methods and
fields; “ClassOrInterface”; “ClassOrClassMember” for classes, interfaces and
class members; and “Instruction” for Carmel instructions.
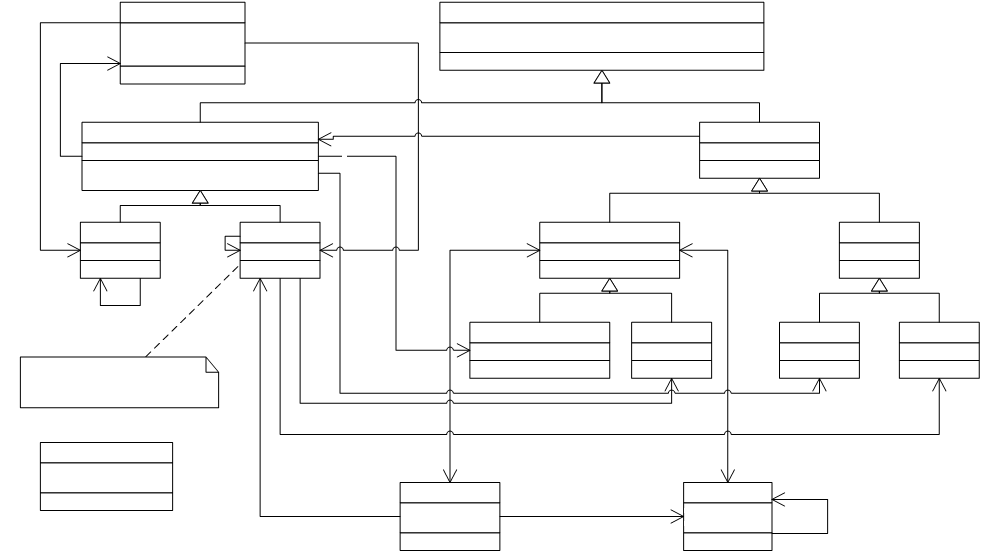
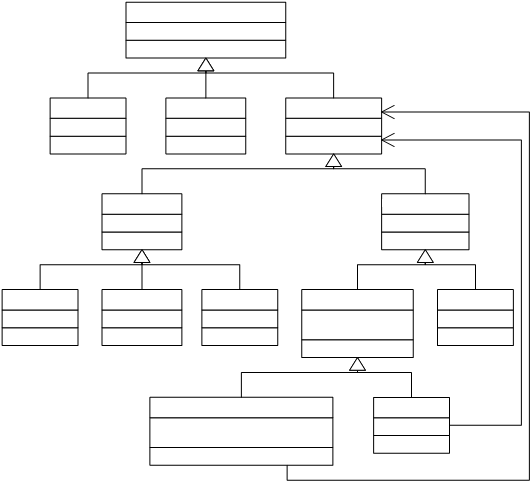
A simplified UML diagram of the resulting abstract syntax
tree is shown in Figure 5. To conserve
space, the diagram does not include the 30 Carmel
instructions, all of which inherit from the abstract class “Instruction”.
Up until the level of instructions, the tree structure is
straightforward. The only notable
property is that nodes reference both their parent and their children.
The getMethod, getField and getStaticField methods
implemented by the Class and Interface classes look for the requested class
member in it own class and, if it is not found, delegates the search to its
superclass or superinterfaces.
The isAccessibleFrom method implemented by classes,
interfaces and class members checks to see if, based on its access modifiers,
the class specified in the parameter has the right to access it. This method is very important, as it is the
basis of the Java Card security system, and prevents classes of one applet
being improperly accessed by another.
The rules for access are defined in section 2.7.4 of [LY99].
At the instruction level, I decided not to use a list or an
array to store a method’s (or constructor’s) instructions. All instructions are referred to by their
address, which is a non-negative number.
There is, however, no requirement in the language that the first
instruction be labelled 0, and that subsequent instructions have the address of
one plus the address of its previous instruction, and therefore a direct
mapping from an address to an array index would not be possible. While I could convert and replace the
addresses by array indices, I would still have to store the original address to
be presented to the user. I could have
also used a map between instruction addresses and array indices, but this
approach seemed inefficient.
Finally, I decided to implement a method’s instruction block
as a direct reference to the first instruction.
Each instruction then references its next instruction, as well as any
other instructions to which control may pass as a result of its execution. For example, an “if” instruction would
reference both its next instruction (used if the condition evaluates to false),
and its target instruction (used if the condition evaluates to true). This is an efficient approach which, in
setting the references, also verifies that all instruction address references
are valid.
Instructions still hold their addresses, which are used for
displaying to the user, and for exception handlers. An exception handler covers a range of
instructions, denoted by start and finish addresses, and handles a certain type
of exception by diverting program flow to a given target address. Although exception handlers are nested in
Java, i.e. any one handler range either encloses, is enclosed by, or is
disjoint of, any other handler range, this property is not enforced at the
virtual machine level.
Due to this arbitrary arrangement, it wasn’t possible to add
exception handling information efficiently to the instruction block data
structure, and so I implemented it as a simple list, and had each handler
reference the start and end instructions’ addresses, rather than the
instructions themselves.
Before describing the linker, verifier or interpreter, it is
important to introduce the visitor design pattern [GHVJ94]. This is the design pattern used in the design
of each of those components.
The visitor design pattern can be considered as an
object-oriented way of implementing a switch statement over the runtime type of
a given element.
The most obvious approach to implementing this solution
would be to use a series of if-else checks using the instanceof operator. However, this is not efficient, produces
dirty code, and is not an object-oriented solution.
Assigning each type a unique ID would allow the use of a
switch statement. Although more
efficient, the ID is redundant information that needs to be maintained by the
programmer. Again, it is not an
object-oriented solution.
A more object-oriented solution would be for all elements to
implement an interface, which defines a method for the implementation of the
desired action. The actual method that
is implemented is then determined at runtime by the virtual machine. However, this means that code to perform a
given operation, which is more logically grouped together, is spread out
amongst the different elements. This
also prevents an operation from gathering state information from one element to
the next. Additionally, changing the
operation’s code involves recompiling the element classes, and adding new
operations requires creating a new interface and adding a new method to each
element, again requiring recompilation.
This is especially problematic when the source code is not available for
the different element types.
The visitor design pattern is a solution that avoids all of
these drawbacks. The key to the visitor
design pattern is a double method call, known as a double dispatch.
Figure 6 Participants in the visitor design
pattern
Similar to the previous solution, each element implements an
interface, which defines an “accept” method that takes a “Visitor” as a
parameter. Instead of implementing the
required action in this method, the method makes a second method call back on
the “Visitor”, which in turn implements the action.
Each operation that takes place on the elements implements
thus implements this “Visitor” interface, which defines a “visit” method for
each element type: it is these methods that are called by the elements. Each operation then implements the interface
by implementing the methods to perform the required action.
For a class to execute an operation on a group of elements,
it just asks each element to “accept” the operation passed as a parameter.
As a Carmel source can be stored in a number of ways,
such as in a normal file in the local file system, in a JAR file, as string in
memory, or on the Internet, I created an abstract definition of a Carmel source defining its basic properties and
operations.
Figure 7 Carmel
source
The URLCarmelSource
encompasses both network addresses and JAR files. This is because Java references JAR files as
URLs prefixed by “jar:”.
A source has a name,
which is used to identify the source to the user, and a length in bytes. The methods getReader() returns an instance
of a character reader interface, which abstracts away the implementation of how
characters are actually read. The
optional support for writing, not available for URLs, is useful for allowing
the user to correct an error.
The large majority of parsers are generated automatically by
parser generators. Parser generators
take as an input the grammar of the language to be parsed, and generate the
required parsing code.
The advantages of using a parser generator is that it
generates code that is more efficient and less error-prone than hand written
parsers, in a fraction of the time.
However, as parser generators are not specific to any language, heavily
customising the generated parser can be problematic. As speedy development of the parser was of
paramount concern, and that the resulting parser did not require much
customisation, I decided to use a generator.
The main parser generators that I found for the Java
language were JavaCC [Web01], SableCC [Gag01], ANTLR [Par00] and JLex/CUP
[Hud99].
JavaCC, SableCC and ANTLR are all recursive-descent, or
top-down, parsers, where as JLex/CUP is a bottom-up parser. Recursive descent parsers are generally much
easier to program and debug, due to the intuitive nature of defining the
grammar in a top-down approach. Hence, I
decided against using JLex/CUP, development of which seemed to have stopped in
late 1999.
Investigating SableCC showed it to be an interesting and
well-designed parser generator, which also generates parse trees, also known as
concrete syntax trees. However,
experimentation proved it to be too restrictive: it enforces upon the developer
a number of design decisions; it does not allow “action code”, which, although
not always the most suitable solution in terms of object-oriented design, is
nevertheless a very useful and powerful way of customising the parse process;
and the parse tree it generates requires a large and costly transformation into
a separate abstract syntax tree.
Additionally, development of SableCC is on indefinite hold.
The two remaining parser generators, JavaCC and ANTLR, are
largely similar. They are both top-down
parsers, they both allow action code, and they do not enforce automatic
building of a parse tree. I chose JavaCC
over ANTLR because it supported Unicode (essential as Java, and therefore Carmel,
identifiers are expressed in Unicode), was much more widely used, had more
documentation and support available for it, and seemed under active
development.
As the Carmel
grammar closely resembles Java up until the representation of method bodies, I
based my grammar definition file on a Java grammar that is distributed with the
JavaCC program. Although copyrighted by
Sun, they grant the free use of the grammar for any purpose.
It took me some time to fully understand how JavaCC worked
and the syntax of its grammar definition files.
Fortunately, there was a lot of documentation available, as well as an
Internet newsgroup dedicated to the program.
My first step was then to remove all of the grammar rules
that applied to Java but not to Carmel. In doing so, I realised that the Carmel
syntax specification document would not be sufficient in completely defining
the Carmel grammar. For example, unsupported rules such as a Java
expression or a statement block appeared in the productions for field
declarations and static initialisers respectively, and new definitions for
these rules were not specified.
In a series of emails with Renaud
Marlet, the author of the syntax document, I
was able to provide definitions for these rules. For example, he told me that static
initialisers were not to be supported, and that fields could be initialised
with constant values (including an array of constants where applicable), but
not by complex Java expressions.
However, a replacement rule for an expression was needed
because certain operators were still required, such as a negation operation to
represent negative numbers. I therefore
modified the rule for a numeric literal to allow for an optional minus sign as
well as a casting operation to a numeric type.
I found that the casting operation is useful in defining
bitmapped constant field values using hexadecimal: to define a byte with the
most significant bit set, the hex value is 0x80. However, without a cast, this value is
construed as a positive number, and as bytes are signed, the number is
considered too large. Therefore adding
an explicit cast, e.g. (byte) 0x80, allows the user to define the value
intuitively without causing an error.
Other Java grammar rules that I had to modify were: the
package declaration rule, to include the (optional) definition of a package’s AID;
the constructor declaration rule, to add an alternative syntax of “void
<init>” in place of the class name; the array initialiser rule, to
reflect the fact that arrays are one dimensional and thus cannot have arrays as
their elements; and the parameter rule, to make the declaration of the
parameter name optional, as it is purely informational.
At the lexical level, I removed the keywords that were no
longer needed, such as long, float, synchronized, etc., and the lexical rules
for floating point numbers.
The next step was to add the rules for Carmel
instruction blocks. Using the syntax
definitions in Renaud’s document, I added the necessary keywords and created
the necessary JavaCC grammar productions.
Once this was completed, I was able to test the parser with sample Carmel
files.
I soon noticed a problem involving the new Carmel
keywords and the lexical definition of an identifier. A Java identifier is defined as any letter
followed by an optional sequence of letters or digits, that is not a Java
keyword. In the grammar definition, a Carmel
identifier was defined as any letter followed by an optional sequence of
letters or digits that is not a Carmel
keyword. As identifiers are not changed
in the compilation process, Carmel identifiers should be equivalent to Java
identifiers, but the addition of extra keywords (such as the names of Carmel
instructions and their parameters) meant that a identifier with the name of one
of the new Carmel keywords would be valid in Java but not in Carmel.
For example, “i” is a widely used and valid identifier in
Java, whereas it is a keyword in Carmel
denoting the JCVM integer type.
Similarly, any Carmel
instruction name or instruction parameter name would be a valid Java identifier
but not a valid Carmel identifier.
I tried several ways to solve this problem, the first of
which was to use lexical states. This
first idea was to create two lexical states: one which correctly recognised
Java identifiers, but not Carmel
keywords, and the other which recognised Carmel
keywords but not Java identifiers. When
a Java identifier is expected, the lexical state would change so that it could
be properly recognised, and then the state would switch back to the normal “Carmel”
state.
Unfortunately, my implementation of this solution did not
work as JavaCC is designed such that lexical state changes have to be affected
by lexical rules, not parsing rules.
There was no way to detect when the state should change at a lexical
level, and trying to switch state in a parser rule didn’t work because of the
loose coupling between the lexical analyser (lexer) and the parser: generally
the lexer had already read and processed the upcoming identifier before the
parser matched its input to the production in which the state change would take
place.
Another solution I considered was not to define Carmel
keywords as keywords, but replace them in the grammar with identifiers. The parser would then have to check manually
that the identifier matched the expected Carmel
keyword. I soon abandoned this approach
when I realised its disadvantages: the parser would no longer generate useful
errors, and would tell the user that it was expecting an identifier when it
really wasn’t and, as the rule for a Carmel instruction can start with one of
approximately 30 different Carmel keywords, implementing it without the help of
the lexer would have been very complex.
Finally the solution I chose was to use a parser rule for an
identifier in place of a lexical rule: the parser rule would be a production
which could either match to the previous, erroneous, definition of an
identifier, or it could match with any one of the Carmel
keywords. While still not a very clean
approach, the dirtiness is confined to only one rule, and the changes needed in
the rules which used to use the lexer rule and now use the parser rule are
minimal.
However, this solution did have one drawback: when the
parser was expecting an identifier but didn’t find one, it would tell the user
that it was expecting either an identifier or one of the 48 extra Carmel
keywords, listing them one by one. This
would certainly have confused the user, and so I modified the error reporting
mechanism such that, if an identifier was present in the list of expected
tokens, the extra keywords were removed from the list before the error message
was generated.
A BNF representation of the Carmel
grammar can be found in Appendix
A, and the actual JavaCC file can be downloaded from
the project website.
Parse trees (or concrete syntax trees) can also be built by
automatically. There are two tree
builders that are designed to work with JavaCC: JJTree and JTB. I experimented with both, using the parser I
had already written, but found that the automatically built parse trees
required a significant transformation into abstract syntax trees. I decided to create the tree manually as I
did not think it would not incur any more development time, and would minimise
later transformations.
Building the tree involved adding action code to the JavaCC
grammar. Action code is code that is
inserted by the parser generator into the generated parser at specific points
in the grammar.
JavaCC parsing rules are represented in the generated parser
as methods, and as such can be configured to take parameters and return
values. I modified each parser rule to
return either a node in the tree, or a value that would be used as a property
of a node.
For example, the rule for a class declaration returns an
object of type “Class” which contained references to its fields and methods,
and the rule for integer values returns a value of type “int”, which can then
be included as required as a property of the relevant node.
To better demonstrate the addition of tree building code and
the use of return values and parameters, take for example the simple rule for a
boolean literal. A boolean literal
represents an occurrence of either “true” or “false” in a Carmel
program.
The parsing rule, which needs no explanation, is as follows:
void booleanLiteral() :
{}
{
“true” | “false”
}
In order to modify this code so that it generates part of
the abstract syntax tree, it needs to return a boolean value. As boolean values are implemented as byte
values by the interpreter, it should return an instance of the class
“ByteValue”. Also, as the Java (and
hence Carmel) grammar is defined in such a way that the expected type of a
constant value is always known, the expected type can be passed as a parameter,
and a check made straight away to make sure that a boolean value is really
expected. The new rule, annotated with
action code, is as follows:
ByteValue booleanLiteral(Type
type) :
{
Token t;
ByteValue value;
}
{
(
t = "true" { value = new ByteValue((byte) 1); }
|
t = "false" { value = new
ByteValue((byte) 0); }
)
{
if (type == BooleanType.TYPE) return value;
throw new ParseException("Boolean
value not allowed here", t);
}
}
The variable t, of type Token, contains information about
the token being parsed. In this example,
it is passed as a parameter to the ParseException constructor so that the line
and column number of its occurrence can be included in the error message.
Constant values and primitive types can be easily handled at
the tree building stage; however it is not possible for a parsing rule, given
the name of a class, to return a reference to it in the abstract syntax
tree. As the tree is still under
construction, it is possible that the definition of the reference class appears
later in the same file. The same applies
for class members and instruction addresses.
In these cases, a placeholder reference is used, which is then resolved
at a later stage by the linker.
The linker resolves indirect references in the tree that
could not be resolved (de-referenced) at parse time. The linker is also responsible for finding
invalid references, such as a reference to a field that does not exist, in
which case the class loading process is aborted and an exception is
thrown. This exception contains the
error message and the location (file name, line number, column number) of where
the error occurred.
The references that need to be resolved are those of
instructions, classes, fields and methods.
Instructions are referenced by their address. As references are local to a method,
instruction references can be resolved very simply by means of constructing a
map. For each instruction, except the
last, the linker also creates a reference to the next instruction.
Classes are referenced by their name. It is not specified in [Mar01] whether class
names should be fully qualified (i.e. include their package component). While this would have simplified the implementation
of the linker, it was decided in consultation with Renaud that enforcing this
restriction would both make Carmel
programs difficult to read, and overly burden the programmer. In defining how an unqualified class name
should be resolved, I consulted [GJSB00] and implemented the Java language rule
specified in section 6.5.5.
Class references do not necessarily refer to classes
declared within the same file, in which case the declaring file has to be found
and loaded (see section 3.7). However, it
is important to keep in mind the fact that two classes may refer to each
other. Resolving a class reference by
loading the referenced class normally (i.e. parsing, linking and verifying it)
is not possible since, if the referenced class makes a reference to the original
class, resolving that reference will cause the original class, not yet fully
loaded, to be loaded again and linked again, causing an infinite loop.
The solution to this problem was to not to link classes
immediately when resolving class references, but delaying the linking process
until the referring class had finished being linked.
Fields are referenced by their name. Once the parent class of the field is
resolved, as described above, resolving a field reference is simple.
The linker is also responsible for the creation of field IDs. Field IDs allow a class instance’s field
values to be efficiently stored and accessed in an array. The Field ID of a field remains the same in
all class instances, whether it is a direct instance of the declaring class, or
a subclass of it.
Such a solution is more efficient than storing field values
in a map, indexed by their name, or maintaining a chain of class values
containing declared field values, one for the instance’s class and one for each
its superclasses, and implementing a lookup mechanism.
Field IDs are assigned by the following algorithm:
1. If
the class has a superclass, its instance fields are recursively assigned
identifiers.
2. If
no superclass declares an instance field, the first field ID to be assigned by
this class is 0; otherwise it is one greater than the highest field ID defined
by its superclasses.
3. For
each field declared by the class, a field ID is assigned. The first field is assigned the field ID
found in step 2, and subsequent fields are assigned IDs one greater than that
of the previous field.
4. If
the ID assignment was requested by a subclass, return the highest field ID.
A method is identified by both its name and its parameter
types, together known as its signature.
As parameter types may be classes, these classes need to be resolved
before a method’s signature is created.
This means that to resolve a method reference, not only does the
method’s parent class need to be loaded, but it also needs to be linked so that
its method’s parameter types are resolved.
However, as explained in 3.5.2, immediately linking referenced classes can result in
an infinite loop.
To avoid this problem, the linking process is split into two
passes. In the first pass, instructions,
classes (including parent classes of method references, and method parameter
types) and fields are resolved. The
first pass delays the linking of resolved classes, as explained earlier. Once all classes have been linked by the
first pass, the second pass is launched.
The second pass resolves method references. As the parent class of all method references
has now been linked by the first pass, the method signatures have been
determined and the linking can take place.
The first pass creates a map from method signatures to methods, and the
second pass simply performs a lookup in the map.
This algorithm is explained in much greater detail in
section 3.7.2.
3.5.4.1
Note on Virtual Methods
The Java Card Virtual Machine, and hence Carmel,
supports virtual methods. Virtual methods
are method calls whose target method depends on the runtime type of the object
on which the method is invoked. For
example, a method invoked on an object whose type is known only as an interface
at compile time will always result in a method invocation on a class. The actual implementing class that is whose
method is invoked is determined by the runtime type of the object concerned.
Although the second pass of the linker resolves virtual
method references, it does so only to ensure that a method will be found at
runtime, and to provide the interpreter with the required information to
perform the runtime method lookup procedure.
The two passes of the linker were implemented as tree
walking visitors that visit the node in a depth-first manner (see section 3.1.5), starting at the package declaration node.
Resolving class references is performed by both the linker
and the package loader (see section 3.7). The linker
is responsible for implementing the conversion of unqualified class names to
qualified names. The package loader,
given the qualified name and required state in the linking process, is
responsible for loading the class. The
package loader is also responsible for launching the delayed linking of
referenced classes.
The verifier ensures that a given Carmel
program is safe and structurally correct.
In [LY99], the verification process is defined as “a set of required
checks to verify that [a class or interface] obeys the semantics of the Java
virtual machine language and that it cannot violate the integrity of the Java
Virtual Machine”.
Verification is a vital part of ensuring the security of the
Java Card platform, without which it would be possible to write programs that
crash the virtual machine, or illegally access and modify other card applets’
data. Verification also prevents
problems associated with version skew: although a Java Card program compiles
correctly with external classes, these classes may have changed since compile
time, and a re-verification checks for unanticipated problems.
As Carmel is simply a representation of the Java Card
virtual machine language, the relevant checks are specified in the Java Card
virtual machine specification (specifically, chapter 4 of [Sun00]), which in
turns refers to checks for the Java virtual machine in [LY99]. Additionally, some of these checks are
formalised in the operational semantics of the Carmel
language [SH01].
There are two types of checks to be carried out: static
checks and structural checks. Static
checks can be carried out by simple analysis of the abstract syntax tree, but
structural checks require a data-flow analysis of instruction blocks.
The majority of the static verification checks specified in
[Sun00] and [LY99] are either not applicable (such as those concerned with the
structural integrity of the binary format .class file) or are implemented by
the linking process (such as verifying that class, field, method and
instruction references are valid).
I read the relevant sections of the three documents and made
a list of the checks that needed to be made.
I reviewed the implementation of the parser, tree builder and linking
passes to ensure that either each check was either implicitly respected (for
example, references to field objects are guaranteed by the Java type system not
to refer to another type of object), or were made explicitly.
In doing so, I added accessibility checks to the linking
passes: each time the linker creates a link between one class and another, it
calls the isAccessible method (see section 3.1.4) of the referenced class or class member, and throws
an exception if the reference is not allowed.
Structural verification checks are more difficult to make
than static checks, as they require a flow analysis of each instruction
block. Examples of such checks are:
·
No matter the path of execution, each
instruction will execute with the correct number and type of parameters on the
operand stack.
·
The operand stack will never overflow or
underflow.
·
Local variables are always assigned a value
before they are accessed.
·
Class instances are initialised before they are
accessed.
Although the large majority of these checks can be performed
at runtime, performing them a load time increases runtime performance, and
helps uncover errors more quickly.
Although a detailed algorithm to perform these checks is
presented in section 4.9.2 of [LY99], its implementation is not simple and requires
each element of the virtual machine state (see section 4.1) to be modelled.
Rather than holding values, these models just hold type information, and
during the course of verification calculate the most specific superclass of
every value they could hold.
Due to time constraints, I did not implement this part of
the verification process. Although
important, I decided to concentrate on developing the components required for a
functioning system before returning to add non-essential ones. I did, however, implement most structural
checks at runtime. The checks that are
performed neither at loading time nor at runtime are detailed in Appendix B.
The package loader provides access to packages in the
abstract syntax tree. It is responsible
for finding Carmel packages and
managing their addition to the abstract syntax tree. It stores references to loaded packages in
the abstract syntax in a cache so that a package and its classes only ever have
one representation in memory.
The package loader also provides access to classes. It simply loads the class’ package and
returns a reference to the class from the resulting package.
It is necessary to define where the package loader expects
to find the source file for a given package name. This had not been specifically defined in any
of the Carmel specifications, and
therefore a decision had to be made.
In discussion with Renaud Marlet,
it was decided that, as Carmel files are representations of CAP files, it would
best to use a loading strategy based on the directory structure and file names
used by Sun’s Java Card converter in creating CAP files.
Before being converted into CAP files, packages are
represented by set of .class files, which are stored in a subdirectory of the
class path defined by replacing each “.” in the package name with a path
separator. For example, the java.lang
package is represented by a series of .class files in the “java/lang”
subdirectory, such as “java/lang/Object.class” and “java.lang.Throwable.class”.
During the conversion process, the converter reads all of
the package’s .class files and creates a CAP file in a subdirectory “javacard”
of the directory containing the .class files.
The CAP file’s name is the last component of the package name appended
with the “.cap” extension. For example,
the java.lang classes in “java/lang” would be converted into the file
“java/lang/javacard/lang.cap” file.
The creation of Carmel
files was then defined to work in a similar manner. However, instead of creating a subdirectory
called “javacard”, the subdirectory is called “carmel”. Likewise, the “.cap” extension is replaced
with a “.cml” extension. For example,
the java.lang package would be represented by the file
“java/lang/carmel/lang.cml”.
If the assumption is made that the original .class files are
located correctly in the Java class path, then the Carmel
package loader can reuse this class path in appending the relative file paths
described above. If this is not the
case, the user can simply be asked to adjust the class path accordingly.
Although not supported in Java Card, Java supports the use
of a default package, which is a package without a name. To allow the greatest flexibility to the
developer, it was decided with Renaud to support this concept in Carmel. However, as the package has no name, the
search algorithm defined above would not work.
The solution was to define that the unnamed package is to be found in a
file referred to by the relative path “carmel/null.cml”. As null is a Java keyword and therefore not a
valid package name, one can be sure that this name will not conflict with that
of a named package.
I discovered that the Java class loader supported the
loading of resources, which are files other than Java classes, using a path
relative to an entry in the Java class path.
This meant that I could delegate the search process to the Java class
loader rather than implementing it myself.
This solution also brought about the advantage that the Java class
loader supports the loading of files from within JAR files (essentially ZIP
files containing Java classes and resources), and from locations on a network
specified by a URL, and I could therefore take advantage of these features for
free.
Once a package source has been found, it must then be parsed
(during which process the tree is built) and linked. As discussed in section 3.5, the linker may ask for the referenced packages to be
loaded, but not immediately linked, or only linked by the first pass of the
linker. Once the requested package has
been successfully linked, the package loader then has to ensure that these
unlinked or partially linked packages complete the linking process before the
requested package is returned and used.
The algorithm and data structures I used are described as
follows:
I defined four stages in the package loading process:
1. Unlinked,
but parsed.
2. Linked
by the first pass.
3. Fully
linked (i.e. by the first and second pass).
4. Fully
linked, with all referenced packages also fully linked.
Packages are stored by the package loader in a map whose key
is the package’s name. There is a map
for each of the four stages. A package
can only be in one of the maps at a given time.
When requesting a package from the package loader, the
minimum required stage can be specified.
For example, the first link pass asks for packages that are in stage 1
or higher, to ensure that the first link pass is not executed on the requested
package as a result of the request, hence avoiding the possibility of an
infinite loop. If no minimum stage is
specified, as is the case for requests which are not made by the linker, then
the last stage is assumed, and hence the package is fully loaded and linked.
First, the loader checks to see what stage the package has
already reached in the loading process.
If the package has not started the loading process, its source is found
and parsed, and is therefore placed in the first stage.
If the package has already reached the requested minimum
stage, it is simply returned with no processing. If it has not, then the package is processed
to reach the requested stage:
To do this, the package loader first ensures that all
packages that have not yet finished the loading process (including the
requested package) have reached the stage just before that of the requested
stage. This is property is required for
the functioning of the different linking processes. The relevant packages are those in the first
stage through to packages two stages before the requested stage. Starting with those in the first stage and
progressing upwards, the following sequence of actions is performed, where
applicable:
1. Launch
the first linking pass on all packages in the first stage, thus moving them to
the second stage. As the first linking
pass can load new packages, this repeats until there are no more packages in
the first stage.
2. Launch
the second linking pass on all packages in the second stage, thus moving them
to the third stage. Again, this repeats
until there are no more packages in the second stage.
Once all of the packages have reached the stage before the
requested stage, the loader can now launch the relevant linking process on the
requested package. This process is one
of the following actions, depending on the requested stage:
1. Do
nothing: the package would have already been parsed and returned, as described
above.
2. Launch
the first linking pass.
3. Launch
the second linking pass. All packages
referenced by the requested package are now assured to have been linked by the
first linking pass, and hence the second linking pass can function correctly.
4. Move
all packages in the third stage to the fourth stage. All referenced packages have been fully
linked, and all of their referenced package have now also been fully linked,
and hence they fulfil the requirements of the last stage.
The requested package has now reached the required loading
stage and is returned.
If at any stage an error occurs, whether it is an error in
parsing or linking, all packages that have not reached stage 4 are
unloaded. These packages are not needed
by packages already fully loaded (as all such packages must be in stage 4), and
cannot ever be moved to stage 4 because they depend on a package that could not
be loaded.
This algorithm is best demonstrated with an example. Assume there are two packages, A and B, both
of which refer to methods in the other.
To load package A, a request is made to package loader with
no specified minimum loading stage. The
package loader therefore assumes that A is to be fully loaded, i.e. should be
in stage 4. As A has not already started
the loading process, its source is found and parsed, and A is placed in stage
1. All packages in stages 1 to the two
stages before the requested stage, that is stages 1 and 2, are then processed
to reach stage 3.
A is then linked by the first pass. The first pass encounters the reference to
package B and requests it to be loaded, this time with a minimum loading stage
of 1, which avoids an infinite loop. As
B has not started the loading process either, its source is found and parsed,
and it is placed in stage 1. As it has
now reached the required stage, B is returned immediately. The first pass of A then completes, and A is
moved to stage 2.
Before progressing to the packages in stage 2, the loader
checks to make sure that there are no more packages in stage 1. As the first pass of the linker has loaded B,
it is now in stage 1, and hence it too is linked by the first pass. When the first pass encounters the reference
to package A, it requests it to be loaded with a minimum loading stage of
1. As package A is in stage 2, the
package is returned immediately. The first
pass of B then completes, and B is moved to stage 2.
As there are no longer any packages in stage 1, the loader
starts processing the packages in stage 2.
It (arbitrarily) picks A and links it with the second pass. The second pass, when it encounters the
method reference in a class in package B, is sure that B has at least been
linked by the first pass, and hence the method reference can be resolved
safely. The second pass of A then
completes, and A is moved to stage 3.
B is still in stage 2, and is also linked with the second
pass. It too is moved to stage 3.
Now that all of the packages are at the stage (3) before the
requested stage (4), A can now be processed to reach stage 4 and therefore, all
packages in stage 3 are moved to stage 4.
A and B are now in stage 4 and the class in A is now returned. As A is fully linked, and the packages it
references (B) are fully linked, this package is now fully loaded and safe to
use.
Having implemented the above search and loading algorithms,
I received from Renaud a sample Carmel
program which was comprised of several packages all defined in the same
file. Unfortunately, in order for the
package loader to find a package definition, each package must be defined in a
separate file, and as such, this file could not be loaded by the package
loader.
As Renaud told me that it would be desirable for the
interpreter to support such files, I had to devise a way that they could be
used without breaking the existing search algorithm. The solution was as follows:
First, I added a new starting rule for the grammar to accept
this alternative syntax. The associated
method returned a list of packages.
Secondly, each one of these packages was then added to stage 1 of the
linking process (see section 3.7.2). This ensures
that any requests for the packages would succeed without having to search the
class path. Finally, to link all of the
packages, a request is made to fully load each package.
Once a program’s packages have been successfully loaded and
added to the abstract syntax tree, they are ready to be interpreted. The first section details how the internal
state of the virtual machine is modelled.
The second section discusses how the virtual machine communicates with
applets. The third and fourth sections
describe how the interpretation of method calls and Carmel
instructions are implemented.
The result of interpreting a Carmel
instruction is a change in the virtual machine’s internal state. To facilitate the implementation of the Carmel
instruction set’s defined operational semantics, I closely followed the model
described in [SH01], which defines three main components of the interpreter’s
state: the method call stack; the heap, which stores all instantiated classes
and arrays; and the set of static field values.
The method call stack and the heap, along with the package
loader, which represents the loaded Carmel
programs as well as static field values, are held by a parent class called
VirtualMachine, which represents the overall state of the virtual machine.
The method call stack contains all currently executing
method calls. Each method invocation
pushes the new method onto the method call stack, and a method return pops the
method back off again. The method at the
top of the call stack is the method currently being interpreted. The method below it is the invoking method,
whose interpretation is paused until the currently executing method is popped
from the stack by returning a value or throwing an exception.
Each method has its own operand stack and local variable
array, along with its current program counter.
The operand stack is used to hold the operands for Carmel
instructions. Unlike most machine
languages, Carmel instructions are
stack-based. Instead of taking their
operands from registers and returning their result in a register, they take
their operands from and place their results onto the operand stack. For example, adding two integers requires
pushing both numbers on the stack and executing the add instruction, which pops
the two numbers from the stack and pushes the result.
The local variable array holds the values of a method’s
parameters, as well as any other temporary variables that the programmer may
use.
A UML diagram of the call stack and the information that it
holds is shown in Figure 8.
The CallStack class represents the call stack, and provides
standard stack manipulation methods. The
values are held internally as a linked list, which provides fast addition and
removal of elements at the beginning and end of the list.
For each method on the call stack, the call stack must hold
its local variable array, its operand stack and the current program
counter. These values are held by the
StackFrame class.
The local variable array is implemented by the array-backed
LocalVariables class, which provides fast random access to its values. The operand stack is implemented by the
OperandStack class. Like the call stack,
it is backed by a linked list and provides standard stack manipulation methods.
The program counter is represented by the ProgramCounter
interface, which is implemented by both instructions and exception
handlers. Although a real JCVM’s program
counter would only ever reference an instruction, representing the use of an
exception handler as if it were an instruction is an effective way to make the
user aware of when an exception causes the execution branch away from the
normal program flow.
Finally, the StackFrame class holds a reference to the
method’s node in the abstract syntax tree, from which its instructions and
exception handlers can be obtained for interpretation.
Figure
8 Call stack
Note: Method, Instruction and ExceptionHandler are shown in
greater detail in Figure 5, and StackEntry is shown in greater detail in Figure 10.
The heap is responsible for allocating memory, and assigning
heap locations to newly created objects.
In a real JCVM, the operand stack, local variable array and static
fields reference class and array values by their heap location. The heap then maps these heap locations to
the actual values in memory.
While I could have represented class and array values as
heap locations, and used the heap to look up their actual values from memory,
closely mimicking the action of the real JCVM heap, I decided that such an
approach was unnecessary. Instead, to
make the implementation simple and more efficient, class and array values are
referenced directly.
However, in order not to lose the useful heap location
information, I added a heap location field to each reference value, so that it
could be used to represent the value to the user, as if it were in fact just a
heap location.
The mapping of heap locations to objects, while not used by
the interpreter, is maintained to show to the user. This was implemented as an array-backed list
of mapping objects to allow for fast random access.
This implementation is both efficient while still allowing
the “real” behaviour to be modelled.
Figure 9 Modelling of the heap
Note: although HeapLocation is implemented by an integer, it
is represented by a class in the above diagram for clarity.
Static field values are stored directly in the StaticField
node of the abstract syntax tree, and are made accessible to instructions by
the linker (see section 3.5.1), which replaces an instruction’s textual reference
to a static field with a direct reference to the respective StaticField
instance.
Static field values can be shown to the user by retrieving
their values from the abstract syntax tree, which is made accessible by the
package loader (see section 3.7).
There is a value for each virtual machine type (see section 3.1.2).
The simplest value to implement was the undefined value, ^. This was implemented by a singleton class
BottomValue.
The value of a return address is not implemented by a class
holding the address of an instruction, by directly by the instruction itself in
the abstract syntax tree. This removes a
layer of indirection, and is a consequence of the abstract syntax tree design,
discussed in section 3.1.4.
The rest of the values fall into two categories: numeric values,
represented by the abstract class NumericValue, and reference values,
represented by the abstract class ReferenceValue.
I defined a class for each type of numeric value: ByteValue,
ShortValue and IntValue. Their value is
represented internally by a Java value of the corresponding type. As Carmel
and Java numeric operators are identical, this means that the implementation of
arithmetic instructions can be performed directly by the Java language.
There are two types of reference value: null, which is implemented
by the singleton NullValue class, and non-null values, represented by the
abstract class NonNullValue. Non-null
values can be either be array or class instances.
Array instances are implemented by the ArrayValue
class. Arrays are represented internally
by a Java array of Value objects.
Class instances are implemented by the ClassValue
class. The value of a class instance is
determined by the values of its instance fields, both those declared in the
class itself, and those declared in its superclasses. These field values are held in an array of
Value objects. The indices of the array
correspond to Field IDs, which are assigned during the linking process,
described in section 3.5.3.
Figure
10
Representation of values
Note: Instruction is shown in greater detail in Figure 5.
A real Java Card
interacts with a card reader.
Communication between a Java Card and a Card reader takes place using
packets called APDUs (application protocol data unit), and takes place as
follows:
1.
The card reader sends a message to the card
specifying the applet to be executed.
Applets are identified by AIDs (applet identifiers), unique numbers
which are assigned by the International Standards Organisation (ISO).
2.
The card reader then sends the data that the
applet is to process. This is represented
by one or more APDUs.
3.
The JCVM creates class instances to represent
the received APDUs, and begins interpretation of the requested applet.
4.
The applet processes the request and returns its
result in an APDU. This APDU contains a
status word (SW) and can optionally include additional data.
5.
The JCVM returns the APDU to the card reader.
The Java Card
platform provides a framework of classes that simplify receiving, processing
and sending of APDUs, so that programmers can concentrate on application
specific code. Each Java Card applet
extends the framework class java.framework.Applet, which defines a number of
methods which are called by the virtual machine upon the receipt of an
APDU. Applets respond to these messages
by returning a value or throwing an exception.
Applets can also access certain internal structures of the virtual
machine via the framework classes, which are implemented using native methods.
However, to support
this type of interaction, I would have needed to implement the Java Card
framework classes, their required native methods, and I would have had to
design a way for native methods to be called.
Unfortunately, due to a lack of time, I was not able to implement such a
solution.
Instead, I
implemented subset of the framework classes, containing only those which are
essential to the virtual machine itself.
These classes are in the java.lang package and include Object, the
superclass of all other classes; Exception, the superclass of all exceptions; and
all of the classes for exceptions thrown internally by the virtual machine.
As for the
interaction between the virtual machine and applets, I implemented a simpler
but more flexible form of interaction.
For any class, the user is able to:
1.
Invoke static methods that don’t take any
parameters. This is similar to the
static void main method that Java programs implement, with the exception that
methods are not obliged to return void, but can return any value.
2.
Invoke constructors that don’t take any
parameters. The initialised class
instance is returned.
3.
Invoke instance methods that don’t take any
parameters on a class instance (either created by step 2, or in the code of
another method).
I decided to implement Carmel
method invocations directly with Java method invocations by adding an
“interpret” method to the StackFrame class, which is responsible for
interpreting its method. This means that
the interpreter’s call stack is in fact implemented by the underlying Java call
stack. However, to be able to represent
the call stack to the user, the “interpret” method pushes itself onto the
CallStack class’ stack immediately on being invoked, and pops itself off again
when it returns or throws an exception.
In this way, the state of call stack is modelled while not incurring the
cost of explicitly modelling its behaviour.
The interpret method comprises of a loop that interprets the
instruction at the program counter, advances the program counter, and
repeats. While this represents the
normal sequence of event in a Carmel
method, there are three notable exceptions: branches, method returns and
exceptions.
There are a number of instructions that cause instruction to
branch away from the next instruction, such as the goto and if
instructions. To handle these special
cases, I had the implementation of those methods throw an exception,
BranchException, containing the new value of the program counter. The interpret method then catches this
exception and sets the program counter accordingly.
The return instruction takes the value at the top of the
operand stack and returns it to the invoking method. As the interpret method does not implement
the return instruction directly, the implementing method cannot simply return
the required value. Therefore, as
before, I had the method that implemented the return method throw an exception,
ReturnException, containing the value to be returned. The interpret method then catches this
exception and returns the enclosed value.
Finally, Carmel
exceptions are implemented in much the same way by an exception called
CarmelException. CarmelException is
caught internally within the interpret method, which then searches the method’s
exception handlers for a suitable handler.
If no handler is found, the exception is rethrown to the invoking
method’s interpret method, which then performs a search on its own exception
handlers, etc., until the exception is either handled or caught by the virtual
machine itself.
Pseudo-code of the interpret method is shown in Figure 11. At the time
of its invocation, the method’s parameters have already been passed to the
StackFrame class’ constructor, which puts them in the local variable array.
Figure
11 Method
interpretation pseudo-code
In the abstract syntax tree, each method references its
first instruction, and each instruction references their next instruction,
along with each other instruction that may be executed after it (for example,
goto instructions reference their target).
As these references may be any type of instruction, their declared type
is the abstract type Instruction. This
means that in order to interpret an instruction, its runtime type is needed.
The visitor design pattern, as discussed in section 3.1.5, provides an efficient and clean way to implement the
interpretation of instructions based on their runtime type. I therefore created an inner class called
InterpreterVisitor which implemented the InstructionVisitor interface. The InstructionVistor interface declares a
method for each instruction type, and the InterpreterVisitor implements them
with the code to interpret each instruction.
As interface methods must always be public, the advantage of
using an inner class is that it these public methods, which should never be
called directly, are not accessible outside of the StackFrame class. At the same time, the inner class has
unrestricted access to the enclosing StackFrame class.
In implementing the instruction set, I constantly referenced
their operational semantics, as defined in [SH01]. The effect of the code that I wrote for each
instruction on the state of the virtual machine had to be exactly the same
effect defined for the instruction’s semantic rule or rules. As I had based the design of the runtime
structures on their definition in this document, I found that the code was
simple to implement.
As mentioned in section 3.6, as I had not implemented the structural verifier,
the interpreter cannot assume that all operands will always be of the correct
type, that local variable indices will always be valid, and that the operand
stack will never underflow. Such checks
therefore have to be performed at runtime, and I created a new exception called
VerificationException to represent the occurrence of verification errors that
would normally have been detected during the loading process.
With the exception of the nop instruction, which is
implemented by an empty method, the following sections group the Carmel
instruction set by functionality, and briefly describe how it was
implemented. As most of the virtual
machine had already been modelled, the instructions’ implementation delegates
most of its work to methods of the classes that model the relevant structures.
A useful one-page synopsis of the Carmel
instruction set can be found in [Mar01].
There are stack instructions to push a value, pop a value,
pop multiple values, duplicate values, and swap values. The push and pop actions were already
implemented by the operand stack, and I decided to add the additional actions
to the operand stack class itself.
Therefore, the interpreter simply takes the instruction’s parameters, if
any, and calls the relevant method on the operand stack.
There are three local variable instructions, get, set and
inc. For get and set the interpreter
simply calls the relevant method on the local variable array, pushing the
result and popping the new value respectively. The inc instruction increments a value in the
local variable array by a constant value.
I implemented this by getting the value from the local variable array,
incrementing it using the add operation described in the next section, and
setting the variable to its new value.
Although there is only one arithmetic instruction, it
encompasses all numeric operations on all types. As the implementation of a numeric operator
depends on its type, I decided to add the methods needed to perform them to the
classes that represent JCVM numeric types, namely JCVMByteType, JCVMShortType
and JCVMIntType.
I implemented two methods, one for unary operators and the
other for binary operators. Operators
are identified by integer values, which are defined by constant fields in the
JCVMNumericType class.
The methods simply apply the equivalent Java operator on the
Value objects’ underlying Java values.
The method then constructs and returns a new Value object to hold the
result.
The interpreter therefore checks to see whether the operator
is unary or binary, pops the appropriate number of operands from the stack,
calls the appropriate method on the instruction’s type value, and pushes the
result onto the stack. It also catches
java.lang.ArithmeticException, which is thrown by Java when dividing by zero,
and throws a CarmelException with an instance of the corresponding Carmel
java.lang.ArithmeticException class.
As described in section 4.3, methods in the InterpreterVisitor class throw a
BranchException in order for the program counter to jump to a new instruction.
There are three unconditional branch instructions: goto, jsr
and ret, the simplest of which, goto, is implemented simply by throwing a BranchException
containing its target address. The jsr
and ret instructions jump to and return from subroutines respectively. The jsr instruction pushes its next
instruction onto the operand stack, and the ret instruction retrieves the
return address from a local variable.
Both of these were easily implemented with existing methods.
The three remaining branch instructions are
conditional. They are if, tableswitch
and lookupswitch. The if instruction
compares two values with a given conditional operator. I implemented conditional operators in much
the same way as numeric operators, by adding a method to each class that
represented a JCVM type, and implementing the operators by applying the
equivalent Java operator.
The lookupswitch instruction defines a mapping of values to
instruction addresses along with a default address. The tree builder creates instances of the
referenced values and the linker creates a mapping from the values directly to
the relevant instructions. The
interpreter has then only to pop the value from the top of the operand stack,
pass it to the map’s lookup method and jump to the returned instruction. In case the lookup fails, it jumps to the
default instruction.
The tableswitch instruction is similar to the lookupswitch
instruction, except that it deals with a set of consecutive numeric values
starting at a given value, which can be more efficiently stored in an
array. The tree builder creates this
array of the instructions, and the interpreter pops the value from the top of
the operand stack, subtracts the start value and uses the result as an index
into the array. It jumps to the indexed
instruction, and if the index is out of bounds, it jumps to the default
instruction.
The instanceof and checkcast instructions both perform the
same operation, which is to check whether the value on the top of the operand
stack is assignable to the instruction’s reference type parameter. This check is performed using the
isAssignableFrom method of the reference type, as described in section 3.1.1.
In the case of the instanceof instruction, the reference
value is popped off the stack, and the short value 1 or 0 is pushed onto the
stack depending whether the value is or is not assignable, respectively. In the case of the checkcast instruction, the
value is left on a stack and a java.lang.ClassCastException is thrown if the
value is not assignable.
The new instruction creates a new instance of a class, or a
new array value. In order to produce
cleaner code, and to increase type safety, I represented the new instruction in
the abstract syntax tree by two different classes, one for creating a new class
instance and the other for creating a new array value. The operational semantics of the instruction
remain unchanged.
The new class instruction creates a new instance of the
ClassValue class, passing the required type as a parameter to its
constructor. The value registers itself
with the heap and creates its field array, setting them to their types’ default
values. The new class instance is then
pushed onto the stack.
The new array instruction performs exactly the same
operation with the ArrayValue, which again registers itself with the heap and
initialises its elements to its component type’s default value. The new array value is pushed onto the stack.
The four field access instructions get and set instance and
static field values. In all cases, the
linker generates a direct reference to the field node in abstract syntax tree
and puts it in the instruction’s node.
All that remains to be done is to call the get or set method on the
field node. Accessing instance fields
requires a class instance, which either is popped from the operand stack or is
designated by the instruction as being the class instance of the currently
executing method.
There are two instructions for getting and setting array
elements. They take an index and array
value from the stack and call the get and set methods of the ArrayValue
class. The last object instruction is
arraylength, which pops an array value from the operand stack and pushes its
length as a short value.
The Carmel
language defines three instructions with which to invoke methods:
invokedefinite, invokevirtual and invokeinterface.
invokedefinite is used to invoke non-virtual methods such as
static methods and constructors, and to bypass virtual method lookup when
invoking instance methods. Like the new
instruction, to produce cleaner code and to increase type safety, I represented
the invokedefinite instruction by two instructions, one to invoke constructors
and the other to invoke methods.
invokevirtual is used to invoke instance methods, and invokeinterface
methods is used to invoke interface methods.
All instructions take method parameter values, if any, from
the operand stack, along with the class instance on which to invoke them, with
the exception of static methods.
invokevirtual and invokeinterface perform a virtual method lookup to
determine the actual method to be invoked, whereas the invokedefinite
derivatives hold a direct reference to the method to be invoked.
A new stack frame is created, with the method to interpret,
the class value (if relevant) and the method parameters (if any) passed as
parameters to the constructor. The
interpret method of the stack frame is called which causes the interpretation
of the calling method to be suspended until the interpret method returns. If the method has a return type other than
void, its result is placed on the operand stack.
The last method instruction, return, takes the return value
(if any) from the operand stack and throws a ReturnException containing this
value. As described above, the interpret
method catches this exception and returns the value to the calling method.
The throw instruction simply pops a class instance
representing the exception to be thrown from the operand stack and throws a
CarmelException containing this instance.
As described above, the interpret method catches this exception and
handles the exception accordingly.
Now that the interpreter had been implemented, its user
interface had to be implemented. The
user interface allows the user to control the interpreter by loading packages
and invoking and stepping through methods.
The interface graphically displays the interpreter’s state so that the
user can see the effect of his or her actions.
In the first section, I describe which set of graphical
components I decided to use. The
following two sections describe the Model-View-Controller and Adapter design
patterns, which were used in designing the interaction between the graphical
components and the interpreter. The
remaining three sections describe the design and implementation of the
different components of the user interface.
Java supports two different sets of graphical components:
the Abstract Windowing Toolkit (AWT) and the Java Foundation Classes (JFC,
although commonly referred to as Swing).
AWT components are implemented by the underlying operating
system, and as Java runs on multiple operating systems, AWT components
represent the lowest common denominator amongst its supported operating
systems. Unfortunately, this means that
the set of AWT components is limited, and hence they are not suitable for use
in the development of complex user interfaces such as that of the interpreter.
Swing components, however, are implemented in Java. There are many components to choose from, and
new components can easily be created using subclassing and composition. As they are not implemented in native code,
they can often be slow to interact with, although on a modern computer system
their performance is acceptable.
Additionally, performance is not a major concern in the implementation
of the interpreter.
For these reasons, I chose to use Swing to implement the
graphical user interface. All
non-trivial Swing components use the model-view-controller design pattern,
which is discussed in the following section.
The Model-View-Controller (MVC) design pattern, discussed in
[BMRSS95], is a modular way to design user interfaces.
It separates the user interface into three types of
components: the model, which maintains the state and data to be represented;
the view, which graphically represents it to the user; and the controller,
which effectuates the user’s commands as changes to the model. The views register themselves with the model,
which sends notifications each time its state or data is changed, so that the
views can update their display.
The design pattern has a number of advantages. It results in a clear and easily
understandable design. Its modularity
means that an addition or modification of a view or a controller can be
performed without modifying any other component. Finally, it supports multiple views and
controllers.
Swing provides a number of different views, such as lists,
tables and text areas, as well as number of different controls, such as buttons
and menus. Some Swing components, like
text areas, encapsulate both a view and a controller.
In order to use Swing components, the developer must
implement its data model, which is an interface which defines the interaction
between the Swing component’s view and the underlying data model. This interface defines the methods which are
used to register and deregister a view with a model, and the methods used to
retrieve the data. The model must also
send update events to the component in a predefined type of object.
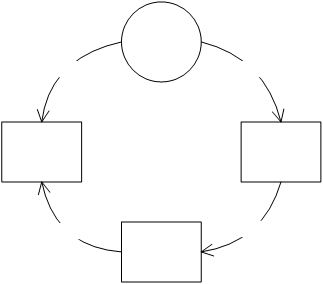
Figure 12 Model-View-Controller and the user
As the model and event are quite specific to the view, it is
very common to implement them using an adapter.
In this design pattern, the data model has its own interface for
accessing the data, which is specific to the type of data stored, and sends its
own type of event object when its data changes.
An adapter is therefore a class which implements the Swing component’s
data model interface and translates requests for data into method calls using
the model’s interface. Likewise, it
receives events from the model in the model’s event type and translates them into
the Swing component’s event type and forwards them to the component.
The data models for each of these components were already
implemented. Each of them implemented
methods for a view to retrieve their state, and for controllers to change
it. However, in order to use them as
models in the MVC design pattern, I had to implement the sending of
notifications each time the state changed.
|
State
|
Existing model class
|
Types of Changes
|
|
Loaded packages
|
PackageLoader class
|
New package loaded
|
|
Static field values
|
StaticField nodes in AST
|
Value changed
|
|
Heap values
|
Heap class
|
New value allocated
|
|
Method call stack
|
CallStack class
|
Method invoked
Method returned
|
|
Program counter
|
StackFrame class
|
Program counter changed
|
|
Operand stack values
|
OperandStack class
|
Value(s) pushed
Value(s) popped
|
|
Local variable values
|
LocalVariables class
|
Value
changed
|
Figure 13 Interpreter state models
The preceding table lists each element of the interpreter’s
state, its existing model class, and the types of changes that can occur to the
state.
Therefore, for each model class, I implemented the
following:
·
An event object to represent the possible
changes to the model
·
A listener interface to be implemented by any
class that receives these events: event notifications are sent by invoking one
of these interface methods with the event object as a parameter
·
A list of currently registered listeners and
methods for listeners to register and deregister themselves
·
For each type of change, a method which creates
an event object and calls the relevant interface method on each of the
registered listeners.
·
Each time the model changed its state, a call to
the relevant method to perform the notification.
Each element of the interpreter’s state needs to be
represented graphically to the user. The
following screenshot of the final user interface shows the decisions I made.
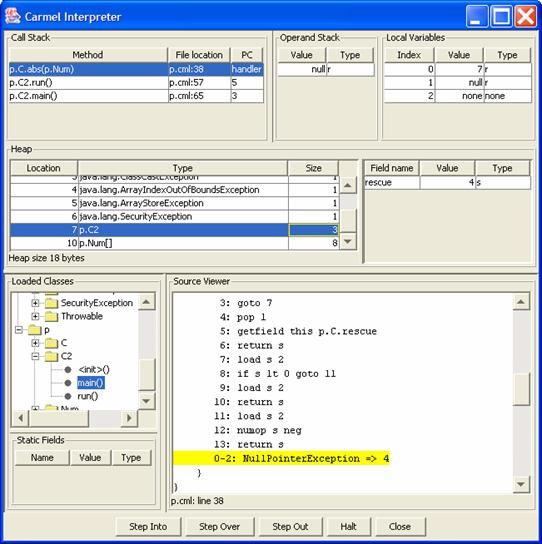
Figure
14
Screenshot of user interface
The loaded packages in the abstract syntax tree are
represented graphically by a tree.
Starting at the top level, the tree shows the loaded packages, then
their classes and interfaces defined by them, and then the methods declared by
those classes and interfaces. The rest
of the program structure can be examined in the source viewer panel, which
automatically opens the source file at the definition of the selected node in
the abstract syntax tree.
The source viewer panel, which can also support editing, is
a custom component comprised of a text area, and takes a CarmelSource class as
its model (see section 3.2).
The tree’s data model is an adapter which takes its data
from the abstract syntax tree, which is modelled by the package loader. The package loader event signifying the
loading of a new package is transformed into an event to tell the tree view
that a tree node has been added.
The static field values, which are stored in the abstract
syntax tree, are viewed in a table. In
selecting a node in the abstract tree, if the node is a class or interface, or
the child of a class or interface, that class or interface’s static fields are
shown in the table.
The table data model is an adapter which represents each of
a class’ static fields, and presents them together in alphabetical order. Field value update events are transformed
into table row update events.
The source viewer panel, this time not in read-only mode, is
also used when informing the user of an error in the loading process. I implemented a dialog box which represents a
loading error, which displays the erroneous file at exact location of the error
along with the error message. The user
then has the opportunity to edit the source file and correct the error.
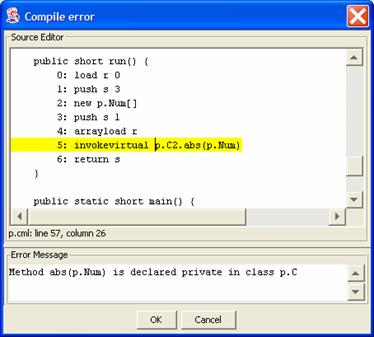
Figure 15 Loading error dialog
The call stack is represented as a table, with each row
representing a method invocation. The
first row in the table represents the top of the stack, and hence the currently
executing method. The table data model
is an adapter of both the stack frame and the program counter classes,
presenting the two classes’ state together in the same view. Selecting a method’s row in the call stack
table also represents the program counter by opening the Carmel
source file in which it was defined and highlighting the instruction or
exception handler to which the program counter refers to.
The operand stack is represented as a table, whose rows
represent its values. The first row
represents its topmost element. The
local variable array is also represented as a table of values, this time with
an additional column for the value’s index.
The state of the heap is represented by two tables. The first table lists the memory allocated,
showing the start location of the block, its size in bytes, and the type of the
object which was allocated the block. By
selecting a heap location, the second table shows the value of the referenced
object, whether an array value or a class instance. Array values are represented by a row for
each element whereas class instances are represented by a row for each instance
field.
The remaining parts of the user interface were the
controllers. The controllers are the
components that allow the user to modify the state of the models. In terms of the interpreter, the controllers
allow the user to configure and launch the package loading process and to run
and step through method invocations.
When a method is not being interpreted, the interpreter
window, shown in Figure 14, displays the following buttons at the bottom of the
window.

Figure 16 Loading control buttons
The addition of an ellipsis to the button’s caption is a
convention to indicate to the user that further information will be demanded
before the action takes place, which also means that the user will have a
chance to cancel the action.
The first two buttons launch the loading process. The “Load Package…” button asks the user for
the name of the package to load, and asks the package loader to load it. If the package is found, its new node in the
abstract syntax tree view is highlighted automatically, causing its declaring
file to be shown in the source viewer window.
If the package could not be found, the user is informed and is suggested
to check the class path.
The “Load file…” button allows the user to bypass the class
path search algorithm and specify directly a file to be loaded. The user can either enter the file’s URL or
browse the local file system for the file.
The first package declared in the file is selected in the AST tree view,
and the source viewer shows the file.
The “Set classpath…” button allows the user to change the
Java class path, which is used by the package loader to find packages. A directory chooser dialog box is available
to find and automatically add a directory.
The “Run Method” button begins method invocation. As described in section 4.2, the interpreter is able to invoke static and
instance methods, as well as constructors, providing that they take no
parameters. To invoke a static method or
constructor, the user must first select the method or constructor in the AST
tree view. To invoke an instance method,
the user must additionally select the class instance on which to invoke the
method from the heap.
Once a method has been invoked, the following set of buttons
are shown to the user with which to pause execution to have time to examine the
interpreter’s state, or to halt execution altogether:

Figure 17 Interpreting control buttons
The first three buttons allow the user to control the number
of instructions that are interpreted before the interpreter pauses.
“Step Into” interprets the instruction at the program
counter and pauses on the next instruction.
If the instruction is a method invocation, it pauses at the first
instruction of the invoked method. “Step
Over” is similar, with the exception that it fully invokes methods and pauses
on the instruction following the method invocation instruction. “Step Out” interprets the remaining instructions
in the current method and pauses execution on the following instruction in the
invoking method. “Halt” aborts
interpretation of all methods on the call stack without executing any more
instructions.
To be able to pause interpretation while at the same time
allowing the user interface to control the virtual machine, I had the
interpretation (i.e. the StackFrame’s interpret method) execute in a separate
thread.
Just after it sends a program counter update event to its
listeners, it calls a method in the VirtualMachine class called
waitBeforeNextInstruction. By default,
the VirtualMachine class suspends the thread in this method, waiting for a
shared variable called wait to become false.
When the user clicks on one of the step buttons, the
relevant step method in the VirtualMachine class is called. This sets the wait variable to false and
reactivates the waiting thread, which then executes the next instruction. Depending on the step operation, it registers
a program counter listener which, each time the program counter changes, checks
to see whether the interpretation should be paused. If so, it sets the wait variable to true and
deregisters itself, causing the interpreter thread to be suspended by the next
waitForNextInstruction method.
To completely halt the execution, there is a second shared
variable called halt. If the
waitForNextInstruction method finds that this variable is true, it throws an
exception which is caught by the main run method of the executing thread, which
stops execution.
This section describes the web-based aspects of the
program. The first section describes the
technology I chose to allow the interpreter to be launched from the web and the
second section describes the steps taken to set up the web server and package the
application.
The web site is hosted by the Imperial College Department of
Computing web server, and its address is http://www.doc.ic.ac.uk/~lj97/project/.
There are two ways in which to launch a Java application
over the Web. The first is by means of a
Java Applet, and the other is by using Java Web Start.
Java Applet technology is designed for small programs that
add functionality to a web page. Their
execution is controlled by the web browser, and their lifetime is only as long
as the user is viewing the web page: navigating away from the page or closing
the web browser causes the applet to stop executing. As applets are embedded into a web page,
network access is required to run them.
Java Web Start, however, is designed to be a way to deploy
Java applications over the web. Clicking
a link to a Web Start application causes it to be automatically installed onto
the hard drive, with icons added to the desktop and/or start menu (or the
equivalent on a non-Windows platform).
Each time the program is run, Web Start checks to see if a new version
is available, in which case it is downloaded and installed. A Web Start application can be configured so
that this step is bypassed if there is no available network connection.
Because the interpreter is an application in its own right
which is not expressly linked to a particular web page, and which does not
require Internet access to run, I decided to use Web Start.
For security reasons, Web Start applications have limited
access the local file system and can only make network connections to the web
server from which they were downloaded.
However, if the application is digitally signed, the user is able to
grant it extra permissions.
A Java Web Start application consists of two files. The first is a JAR (Java Archive) file which
packages together the program’s .class files into one file. If the application is signed, this file also
contains the public key used to sign the program, and a digital signature for
each .class file.
The second is a descriptor file known as a JNLP (Java
Network Launcher Protocol) file.
Clicking on a link to this file in a properly configured browser will
automatically launch Java Web Start to start the application. The file is an XML document that contains,
among other things:
·
The name and description of the application
·
The URL of the application’s JAR file, along
with any other resources it needs
·
Which additional permissions, such as access to
the local file system, the application requires
·
Which class to execute to run the program
·
Whether the application is allowed to run
offline, when it is not possible to check for an update
In order for a web browser to correctly associate JNLP files
with Java Web Start, the web server must be configured to describe the file
correctly when it is downloaded. I am
grateful to the Computing Support Group at Imperial
College for configuring their
secondary web server accordingly.
I therefore packaged the application into a JAR file,
digitally signed it, and created a JNLP descriptor file which included file
system access as an additional permission.
This is required so that Carmel
files can be found and loaded. I then
published the files and verified that everything was working properly.
The final step was then to create the web page itself. The web page provides a brief overview to the
project, information on how to install Java Web Start along with some
troubleshooting information, and a step-by-step guide to using the interpreter.
This section describes the steps that taken to evaluate the
interpreter. The first three sections
concerning the parser, verifier and interpreter evaluate these components in
terms of their specifications: the Carmel
syntax, the Java Card virtual machine specification and the Carmel
operational semantics respectively. The
fourth section evaluates the user interface based on the feedback received from
SecSafe members who took time to test the interpreter. The final section evaluates the use of Java
Web Start as a web launching mechanism, and details some problems experienced
by the testers.
Before starting the project, the syntax of the Carmel
language was defined informally as a human readable way to represent Java Card
programs. However, to implement the
parser, it was necessary to define the syntax in a formal and complete
manner. This formal definition, given in
Appendix A, arose from issues directly relating to the
implementation of the parser, and as such, the parser could be considered as a
“reference implementation” of the Carmel
syntax.
There also exists a printer of Carmel
programs, which converts Java .class files into the Carmel
syntax. The development of this printer,
by Renaud Marlet,
ran in parallel to the development of the parser, and frequent communication
between us ensured that Carmel
programs produced by the printer were being parsed correctly by the
parser. The Carmel
programs being tested were several thousand lines in length and encompassed the
large majority, if not all of the Carmel
syntax.
Additionally, during the parser’s development, I created a
number of test files with which to check that correct programs were being
accepted and that incorrect programs were being rejected.
While the parser was tested extensively, it was not tested
in a systematic and complete fashion.
Such testing would have taken a prohibitive amount of time, and the
value of doing such testing was not apparent.
As described in section 3.6, I consulted the specifications of the Java Card
virtual machine [Sun00], the Java virtual machine [LY99] and the operational
semantics of the Carmel language
[SH01] and made a list of the verification checks that needed to be carried
out.
The verification checks that required a flow analysis of
methods were not implemented, are listed in Appendix
B for reference.
The remainder of the checks were implemented, and I wrote a very simple Carmel
program for each check that ensured that a violation of the check was being
properly detected. This enabled me to
find and correct some errors I had made in their implementation.
Given the importance of the verifier in ensuring the
security model of the Java Card platform, and the importance of security in the
SecSafe project, such informal test cases are not sufficient to make a formal,
quantitative analysis of the verifier’s correctness. However, developing a complete set of test
cases would be a project in its own right, and given the limitation of time and
scope of this project, this was not possible.
In implementing the Carmel instruction set, I closely
followed the operational semantics, as defined in [SH01] by translating the
semantic rule or rules for each instruction directly into Java, then performing
careful factorisation and cleaning up of the resulting code. In testing this code, I wrote and ran a
number of test programs to check that the semantics were being honoured, and
that there were no other bugs.
Formal and complete testing of the interpreter’s conformance
to the operational semantics was not possible.
Such testing requires the careful development of a large number of test
cases, and is outside the scope of this project. I did look, however, for existing test suites
that could be adapted to test the interpreter and came across two.
The first is Sun Microsystems’ Java Card Technology
Compatibility Kit. All commercial
implementations of Java Card virtual machine are required to pass the tests
defined in the kit. However, this test
suite is only available to Java Card licensees.
The second test suite is called the Mauve project (http://sources.redhat.com/mauve/)
and is free, but is for the Java virtual machine. However, it could be possible to base a Carmel
test suite on this suite by converting the test cases that apply to both Java
and Java Card into Carmel, and then
adding test cases for Carmel-specific features.
The user interface, the final version of which is described
in section 5, was developed incrementally. By analysing the information that the
interpreter modelled, and its structure, I developed an initial user interface
which I then provided to two potential users: Renaud Marlet
at Trusted Logic, and Igor Siveroni
at Imperial College. Both of them provided useful feedback which
led to a number of improvements and changes.
This process repeated several times before the interface reached its
final version.
Generally, the comments I received from Renaud and Igor
were positive, and I was able to address most of the problems they found. However, two issues remained unresolved at
the end of the project, due to a lack of time to implement possible solutions.
The first concerns the representation of the call stack and
the operand stack. While the use of a
table was a suitable way to represent the entries in the two stacks, it was not
immediately clear to the user whether the top or bottom row represented the top
of the stack. While I chose to use the
top row as the top element, the stack appears to grow downwards. This is because, when the table doesn’t fill
the space assigned to it, the free space is positioned below it. Therefore, when a new row is added, the old
top row is moved downwards to make space for the new top row. If the free space were to appear above the
table, additions to the stack would cause the stack to appear to grow upwards,
intuitively letting the user know the direction of the stack.
The second issue concerned starting the interpreter by
invoking a method. The interface does
not give any visual cues to suggest that he or she needs to select a method
from the loaded packages tree and then press the “Run Method” button. The solution would be to make the “Run
Method” button show a dialog box which then presents a second view of the tree,
specifically asking the user to choose the method. If the method were an instance method, the
dialog box could then ask the user to choose a class instance on which to
invoke it.
Overall, however, comments from the two test users lead me
to believe that the user interface well represents the internal state of the
virtual machine, and is easy to use.
Java Web Start, while promising a lot of interesting
features such as automatic installation, support for multiple platforms and
automatic updating of programs to their latest version, did not fare well in
practice.
While I was always able to launch the interpreter on my
computer under both Windows XP and Mandrake Linux, it would continually
download the 250Kb application each time it was started, regardless of whether
I had made any modifications to it.
Luckily I had a fast connection and this did not take more than a couple
of seconds, but the possible implications for modem users is much more serious.
Renaud Marlet,
running Linux, was unable to launch the application, and continually received
the error that the web server could not be found. However, he was able to access the web server
with his browser without any problems.
Finally, Rene
Rydof Hansen,
running Linux on an old Apple PowerBook, was running on a platform unsupported
by Web Start.
Fortunately, each of these users was able to download the
application’s JAR file directly and run the interpreter manually.
One last problem I encounter with Web Start was to do with
its class loader. As described in
section 3.7.1, the Carmel
package loader uses the Java class loader to search for Carmel
sources. While this worked well when
running the interpreter as a normal application, I discovered that the class
loader provided to Web Start applications did not recognise changes to the Java
class path, and hence the user cannot specify the location of Carmel
files. The solution to this problem,
again, was to download the application’s JAR file directly and run the
interpreter manually. A better solution
would be not to use the Java class loader and implement the search process
explicitly: again, time proved a limiting factor, and this solution has not
been implemented.
This section concludes the report by giving an overview of
what the project achieved, how this relates to the project’s goals, and
finishes by proposes possible improvements and extensions.
In this project, I designed and implemented:
·
A parser, abstract syntax tree builder, linker
and verifier for the Carmel
language [Mar01], which is a textual representation of the Java Card virtual
machine language (see section 3)
·
A functional Java Card virtual machine, which
interprets the constructed abstract syntax tree in accordance with a defined
operational semantics [SH01] (see section 4)
·
A graphical user interface with which to load
applets onto the simulated Java Card, execute methods, display the internal
state of the virtual machine, and which allows the user to step through the
interpretation (see section 5)
·
A web page from which the program can be
automatically installed and which contains a users’ guide; additionally, the
program automatically updates itself when new versions are made available (see
section 6)
I made use of a number of technologies in implementing the
program. The program is a client-side
and is written in the Java programming language. I used the JavaCC parser generator [Web01] to
create the parser, and Java Web Start technology to automatically install and
update the program over the web.
In implementing the parser, I formalised a previously
informal grammar definition of the Carmel
language (see section 3.3.2 and Appendix
A).
I developed a complex loading algorithm (see section 3.7.2) to handle a multi-pass loading, linking and
verification process. The algorithm is
extensible and supports the addition of further passes.
In the design process, I used several design patterns. Notably, the design of the linker and
interpreter make use of the Visitor design pattern [GHVJ94] to cleanly, and in
an object-oriented fashion, execute code based on an object’s runtime
type. The graphical user interface was
implemented using the Model-View-Controller design pattern [BMRSS95], which
separated clearly the code responsible for modelling the state of the virtual
machine and interpreting instructions from the graphical components used to
view the state and control the interpretation.
The program was designed in a modular fashion, to support
the reuse and future extension of its components.
Largely due to lack of sufficient time, the program did not
meet all of the project’s initial goals.
Specifically:
·
The external interface between the Java Card and
the card reader was not modelled. This
is because only a subset of the Java Card framework classes was implemented,
and native method support was not implemented.
·
The structural verifier of the Java Card virtual
machine was not implemented. This is a
complex component and there was not enough time for its implementation.
·
Although the program uses Web Start as a
web-launching technology, its effectiveness was not proven.
However, I believe that the program that I have designed and
implemented is a functional, self-contained program whose usefulness is not
overly hindered by these omissions, and that implementing these missing
features certainly would not have been possible in the time available. Indeed, my project supervisor did not expect
me to finish the project.
Looking back on my design decisions having completed the
project, there is are a couple of decisions that I would have taken differently
with the benefit of hindsight. While
choosing JavaCC [Web01] as a parser generator enabled me to start coding the
parser more quickly, I believe that taking the extra time to use SableCC
[Gag01] would have provided me with a better tree builder. The current tree builder is very tightly
coupled with the parser, which generally is not a desirable design
property. Similarly, I believe that
implementing the verification steps in a separate pass of the loading process
instead at the same time as the linking passes, while being less efficient,
would have also reduced the coupling between these two distinct operations.
Two improvements have been mentioned in section 7. The first is
to implement the search of the class path manually, rather than relying on the
Java class loader. This would avoid problems
experienced when using Web Start. I also
suggested solutions to two user interface problems, one concerning the
representation of stacks, and the other concerning invoking methods.
Finally, the possibilities to extend this project are
numerous. A few possibilities include:
·
The addition of a structural Carmel
verifier
·
The implementation of the Java Card framework
classes and a user interface allowing the user to send and receive APDUs, which
are messages used by the card reader to control the Java Card.
·
The extension of the user interface to allow the
invocation of methods that take parameters.
The interface would allow the user to enter primitive values and select
reference values from the heap.
·
The development of a test suite to properly test
the virtual machine’s adherence to the Java Card virtual machine specification
[Sun00] and operational semantics [SH01].
·
The addition of an undo mechanism which would
allow the user to step backwards as well as forwards through a program’s
execution. Each instruction would
register the actions that would need to be taken to undo its effect on the
virtual machine state with a centralised “undo manager”, which could then be
controlled by a back button.
[BMRSS95] Frank
Buschmann, Regine
Meunier, Hans
Rohnert, Peter
Sommerlad, Michael
Stal.
Pattern-Oriented Software
Architecture, Volume 1: A System of Patterns. John Wiley
& Son Ltd, 1995.
[Eng99] Joshua
Engel.
Programming for the Java Virtual
Machine. Addison-Wesley, Boston,
Mass., 1999.
[Gag01] Etienne
Gagnon.
(1998) SableCC, an Object-Oriented
Compiler Framework. MSc Thesis. McGill
University, Montreal.
[GJSB00] James
Gosling, Bill
Joy, Guy
Steele, Gilad
Bracha.
The Java Language Specification,
Second Edition. The Java
Series. Addison-Wesley, Boston,
Mass., 2000. See also http://java.sun.com/docs/books/jls/index.html.
[GHVJ94] Erich
Gamma, Richard Helm,
John Vlissides,
Ralph Johnson. Design
Patterns: Elements of Reusable Object Oriented Software. Addison-Wesley, Boston,
Mass., 1994.
[Hud99] Scott
Hudson.
CUP Parser Generator for Java. [online].
Available from: http://www.cs.princeton.edu/~appel/modern/java/CUP/. [Accessed 14 March 2002].
[LY99] Tim
Lindholm, Franck
Yellin. The Java Virtual Machine Specification, Second Edition. The Java Series. Addison-Wesley, Boston,
Mass., 1999. See also http://java.sun.com/docs/books/vmspec/.
[Mar01] Renaud
Marlet.
Syntax of the JCVM Language to Be
Studied in the SecSafe Project.
Technical Report SECSAFE-TL-005, v1.7, Trusted Logic, May 2001. See also http://www.doc.ic.ac.uk/~siveroni/secsafe.
[Par00] Terence
Parr.
ANTLR. [online].
Available from: http://www.antlr.org/.
[Accessed 14 March 2002].
[SH01] Igor
Siveroni, Chris
Hankin.
A Proposal for the JCVMLe
Operational Semantics. Technical
Report SECSAFE-ICSTM-001, v2.2, Imperial
College, October, 2001. See also http://www.doc.ic.ac.uk/~siveroni/secsafe.
[Sun00] Sun
Microsystems. Java Card 2.1.1 Virtual Machine Specification, May 2000. See http://java.sun.com/products/javacard/javacard21.html.
[Web01] WebGain,
Inc. and Sun Microsystems (2001). JavaCC.
[online]. Available from: http://www.webgain.com/products/java_cc/. [Accessed 14 March 2002].
The Carmel Grammar is based on the grammar to the Java
Language, which is defined in §18.1 of [GJSB00].
The grammar uses the following BNF-style conventions:
·
[ x ]
denotes zero or one occurrences of x.
·
{ x }
denotes zero or more occurrences of x.
·
x | y denotes one of either x or y.
The lexical structure of the Carmel
language is identical to that of Java, with the exception of its additional
keywords, which is defined, along with identifiers and literals in section 3 of
[GJSB00]. As discussed in section 3.3, an identifier can take the value of any Carmel
keyword that is not also a keyword in the Java language.
A.1
Identifiers, Literals and Types
Identifier:
IDENTIFIER
QualifiedIdentifier:
Identifier { .
Identifier }
Literal:
NumericLiteral
BooleanLiteral
NullLiteral
NumericLiteral:
[ (
NumericType )
] [ -
] IntegerLiteral
VariableInitializer:
Literal
ArrayInitializer
ArrayInitializer:
{ [
Literal { ,
Literal } [ ,
] ] }
Type:
Identifier { .
Identifier } BracketsOpt
BasicType
BasicType:
NumericType
boolean
NumericType:
byte
short
int
BracketsOpt:
[ [] ]
A.2
Packages, Classes and Interfaces
CompilationUnit:
PackageDeclaration
PackageDeclaration:
package
QualifiedIdentifier AID ; PackageBody
SpecialCompilationUnit:
{ SpecialPackageDeclaration }
SpecialPackageDeclaration:
package
[ QualifiedIdentifier ] [ AID ] ; PackageBody
AID:
{
NumericLiteral { ,
NumericLiteral } }
PackageBody:
{ ImportDeclaration } { TypeDeclaration }
ImportDeclaration:
import
Identifier { .
Identifier } [ . *
] ;
TypeDeclaration:
ClassOrInterfaceDeclaration
;
ClassOrInterfaceDeclaration:
ModifiersOpt ( ClassDeclaration | InterfaceDeclaration )
ModifiersOpt:
{ Modifier }
Modifier: one of
public protected
private static abstract final native
ClassDeclaration:
class
Identifier [ extends
Type ] [ implements
TypeList ] ClassBody
InterfaceDeclaration:
interface
Identifier [ extends
TypeList ] InterfaceBody
TypeList:
Type { ,
Type }
ClassBody:
{ {
ClassBodyDeclaration } }
InterfaceBody:
{ {
InterfaceBodyDeclaration } }
ClassBodyDeclaration:
ModifiersOpt MemberDecl
;
MemberDecl:
MethodOrFieldDecl
void
Identifier MethodDeclaratorRest
Identifier ConstructorDeclaratorRest
void <init>
ConstructorDeclaratorRest
MethodOrFieldDecl:
Type Identifier MethodOrFieldRest
MethodOrFieldRest:
VariableDeclaratorRest
MethodDeclaratorRest
VariableDeclaratorRest:
BracketsOpt [ =
VariableInitializer ]
InterfaceBodyDeclaration:
ModifiersOpt InterfaceMemberDecl
;
InterfaceMemberDecl:
InterfaceMethodOrFieldDecl
void
Identifier VoidInterfaceMethodDeclaratorRest
InterfaceMethodOrFieldDecl:
ConstantDeclaratorsRest ;
InterfaceMethodDeclaratorRest
ConstantDeclaratorsRest:
ConstantDeclarator { ,
ConstantDeclarator }
ConstantDeclarator:
Identifier ConstantDeclaratorRest
ConstantDeclaratorRest:
BracketsOpt =
VariableInitializer
MethodDeclaratorRest:
FormalParameters BracketsOpt
[ throws
QualifiedIdentifierList ] ( MethodBody | ; )
VoidMethodDeclaratorRest:
FormalParameters [ throws
QualifiedIdentifierList ] ( MethodBody | ; )
InterfaceMethodDeclaratorRest:
FormalParameters BracketsOpt
[ throws
QualifiedIdentifierList ] ;
VoidInterfaceMethodDeclaratorRest:
FormalParameters [ throws
QualifiedIdentifierList ] ;
ConstructorDeclaratorRest:
FormalParameters [ throws
QualifiedIdentifierList ] MethodBody
QualifiedIdentifierList:
QualifiedIdentifier { ,
QualifiedIdentifier }
FormalParameters:
( [
FormalParameter { ,
FormalParameter } ] )
FormalParameter:
[ final
] Type [ VariableDeclaratorId ]
VariableDeclaratorId:
Identifier BracketsOpt
MethodBody:
InstructionBlock
A.3
Instructions
InstructionBlock:
{ {
LabeledInstruction } { ExceptionHandler } }
LabeledInstruction:
Address :
Instruction
ExceptionHandler:
Address –
Address :
CatchType =>
Address
CatchType:
ClassType
*
Address:
DecimalNumeral
Instruction:
nop
push
OperandType Constant
pop NbWords
dup NbWords
NbWords
swap
NbWords NbWords
numop
OperandType NumericOperator [ OperandType ]
load
OperandType LocalVariableIndex
store
OperandType LocalVariableIndex
inc
OperandType LocalVariableIndex IntegerConstant
goto
Address
if
OperandType ComparisonOperator [ NullComparison ] goto Address
lookupswitch
OperandType [ MatchTableEntries ] , default => Address
tableswitch
OperandType IndexTableEntry , default => Address
new
ReferenceType
checkcast
ReferenceType
instanceof
ReferenceType
getstatic
Name
putstatic
Name
getfield [ this ] Name
putfield [ this ] Name
invokedefinite
Signature
invokevirtual
Signature
invokeinterface
Signature
return [
OperandType ]
arraylength
arrayload
OperandType
arraystore
OperandType
throw
jsr Address
ret
LocalVariableIndex
OperandType: one of
r b s i
Constant:
NullLiteral
NumericLiteral
NbWords:
DecimalNumeral
ComparisonOperator: one of
eq ne gt le lt ne
NullComparison: one of
0 null
NumericOperator: one of
neg add sub mul
div rem and or xor shl shr ushr to tob cmp
LocalVariableIndex:
DecimalNumeral
MatchTableEntries:
MatchTableEntries { ,
MatchTableEntry }
MatchTableEntry:
NumericLiteral =>
Address
IndexTableEntry:
NumericLiteral =>
{ Address }
Signature:
Name ( [
TypeList ] )
The
following verification checks from chapter 4 of [LY99], have not been
implemented by the Carmel interpreter:
1. There
must never be an uninitialised class instance on the operand stack or in a
local variable when any backwards branch is taken. There must never be an uninitialised class
instance in a local variable in code protected by an exception handler. However, an uninitialised class instance may
be on the operand stack in code protected by an exception handler. When an exception is thrown, the contents of
the operand stack are discarded.
2. Each
instance initialisation method, except for the instance initialization method derived
from the constructor of class Object, must call either another instance
initialization method of this or an instance initialisation method of its
direct superclass super before its instance members are accessed. However, instance fields of this that are
declared in the current class may be assigned before calling any instance
initialization method.
3. If
getfield or putfield is used to access a protected field of a superclass, then
the type of the class instance being accessed must be the same as or a subclass
of the current class.
4. If
invokevirtual or invokedefinite is used to access a protected method of a
superclass, then the type of the class instance being accessed must be the same
as or a subclass of the current class.
5. The
instruction following each jsr instruction may be returned to only by a single
ret instruction.
6. No
jsr instruction may be used to recursively call a subroutine if that subroutine
is already present in the subroutine call chain. (Subroutines can be nested when using
try-finally constructs from within a finally clause. For more information on Java virtual machine
subroutines, see section 4.9.6 of [LY99].)
7. Each
instance of type returnAddress can be returned to at most once. If a ret instruction returns to a point in
the subroutine call chain above the ret instruction corresponding to a given
instance of type returnAddress, then that instance can never be used as a
return address.
8. At
any given point in the program, no matter what code path is taken to reach that
point, the operand stack is always the same size and contains the same types of
values.